Instructions for Using the DISNEY WORLD Planner Spreadsheet
Welcome to our Instructions page, which will help guide you through all of the features and uses of the Disney World Planner spreadsheet.
Saving a Copy
The very first thing to do upon opening the sheet is to save your own copy on Google Drive:
- Click the File menu
- Click “Make a Copy”
- Name it and select a folder to save it in.
- Click “Make a Copy”
Alternatively, you can save your own local copy, however we recommend against this because it changes all of the formatting and some of the sheet’s automatic functionality will be lost. Also, it’s much harder to access the sheet from different devices and to share and collaborate with other people.
- Click the File, go to “Download” and then select the format you’d like to download.
Color Codes Key
Blue text with an underline is a link to other websites/pages/resources.
Light Blue highlighted cells are input fields. This is where you need to enter data. Some of these fields are pre-populated with default or sample data; you need to make sure they’re correct and update them, if necessary.
Yellow highlights are instructions or important information you need to be aware of.
Overview
On your very first time working through this spreadsheet, complete each tab in the order they are numbered and fill in as many inputs as you can to start with. This is because each tab contains input fields that will affect subsequent tabs. You can always come back and change these initial inputs later; we just need to set up your starting point to work from. After that, it’s ok to jump around and change/update the tabs in any order.
As you move through each tab of the spreadsheet, the cells that are highlighted in Light Blue (see above example) are the input cells. These are where you’ll enter the details that are specific to your vacation. Some are blank to start with, while others have placeholder values pre-entered to give you a starting point. All placeholder values should be double-checked using the links provided, because Disney World can change their dates, times and amounts at any time. All other fields/cells should be left alone, because they contain the formulas and calculations that give the spreadsheet all of it’s functionality.
Lastly, don’t forget about the Undo button if you accidentally change something that you didn’t mean to.
In cells with dropdown lists, you can clear the cell by simply selecting the cell and hitting there Delete key on your keyboard.
The Tabs
Planning Checklist tab
This tab lists the major things to do as you plan your Disney trip, and gives a rough timeline for when they should be completed.
Schedule Summary tab
This tab gives you an easy, at-a-glance, big-picture view of your trip. Details will live in the other tabs.
First, it lists the dates of your trip and shows the parks or activities you’ve chosen for each day and the park hours. This info comes from the “Tickets & Park Reservations” tab.
Please note that the spreadsheet is built to support up to a 12-day trip (10 days in parks plus a travel day on each end). For shorter trips, the unneeded days will automatically fill with grey to help you stay focused on just the days of your trip.
Next, it shows any dining reservations you’ve made for each day, including the time of the reservation and which park the restaurant is located in. This info comes from the “Dining Reservations” tab.
If the Date and Park for the dining reservation don’t match the date and park for that day, the related cell in the “Park Where Restaurant is Located” column will automatically be highlighted red to warn you of the scheduling conflict.
1) Tickets & Park Reservations tab
This tab is for recording your Ticket purchases and your Park reservations.
It’s strongly recommended to purchase your tickets as far in advance as possible and get them attached to your My Disney Experience account. You don’t want to spend months planning the trip and then discover the parks are sold out for the dates you want.
Pro Tip: It might be worth including your travel days when buying park passes. For example: If you are staying 6 nights, with 5 full days in-park and a travel day on each end, you could spend a little bit more (maybe only $30 per person per day) and get a 6 or 7 day park pass. This would allow you to access the parks on one or both of your travel days, for instance if you’ll be arriving in the morning or leaving later in the day. We often buy a pass for the travel days because at $30 per person it seems worth it for us even if we only get on one or two rides or eat at one restaurant.
Tickets
Multiple rows are provided in case you’re making multiple purchases, such as for different groups of people.
Enter the Number of Days that you’re buying tickets for and enter the First Day the tickets are good for, then the Last Day will be automatically calculated.
Enter the Number of Adults (over the age of 9 as of your vacation date) and the Number of Kids (ages 3-9 as of your vacation date), then the Total Number of People will be automatically calculated.
Select a checkbox if you’re purchasing one of the optional upgrades (Park Hopper, Park Hopper Plus, or Water Park and Sports). For an additional fee, the Park Hopper options allow you to visit another park after 2pm, as long as there is capacity available. For example, if you visit Animal Kingdom on a specific day, but have a dinner reservation at EPCOT, you will need to park hop. But be aware that you might not be able to get into the park if the park is at full capacity (usually not a problem, but it can happen).
Enter the Cost per Adult ticket and Cost per Kid ticket, then the Total Cost will be automatically calculated. (Double check that this total matches the amount on the Disney website when you complete your purchase.)
Ticket Add-Ons
If you choose one or both of the add-ons offered by Disney, simply mark the checkbox and the cost will be automatically calculated and added to the Grand Total.
The Lightning Lane add-on cost can be variable. The spreadsheet is pre-populated with a default value of $15, but this can be updated to your actual cost after you’ve paid for the add-on.
For Lightning Lane, you can choose the number of days and number of rides per person per day. The spreadsheet is pre-populated with default values, but these can be updated for your specific trip.
Parks
In addition to purchasing your tickets, Disney requires you to make reservations for which park you plan to visit each day. This can be changed later as long as there are available spots open in the park you are changing to.
Start by entering the total length of your trip in the Light Blue cell labeled “# of Vacation Days” (cell A33).
Next, enter the starting date of your trip in the Light Blue cell in the Date column (cell A35).
Please note that the spreadsheet is built to support up to a 12-day trip (10 days in parks plus a travel day on each end). For shorter trips, the unneeded days will automatically fill with grey to help you stay focused on just the days of your trip.
Next, use the dropdown list in the Park/Activity column to select the main activities for that day. The park hours and Crowd Level will automatically populate based on the info on the “Park Hours” tab.
The hours and Crowd Level can change regularly, so you need to update this info on the “Park Hours” tab.
Three rows are provided for each day in order to accommodate park hopping (visiting multiple parks in a single day) or other activities such as travel days.
1.2) Park Hours tab
This tab contains the detailed opening and closing time info for each park on each day. This info is used to auto-populate some of the other tabs.
Park hours can vary and are subject to change. It’s important to verify the park hours for your specific trip dates and update the details on this tab so that you have accurate info to use when planning.
The Disney website publishes park hours roughly 70 days in advance, but they are still subject to change, so we recommend double-checking the hours a couple of times as your trip date gets closer.
All of the parks offer Early Theme Park Entry for guests that are staying at Disney Resort hotels (and other select hotels). These guest are allowed to enter the parks 30 minutes earlier than other guests.
If one of the parks is offering Extended Evening Hours (aka Extra Magic Hours) on a particular day, mark the checkbox and the special closing time will be automatically calculated. This is usually an extra 2 hours past the normal closing time, but cell I8 can be changed if necessary.
If one of the parks is offering a fireworks show on a particular day, enter the time for it in the “Fireworks” column.
Crowd Level
The “Crowd Level” info comes from TouringPlans.com. The sheet is pre-populated with random values (on scale of 1-10) to demonstrate the functionality. If you want to make use of this feature, you’ll need to go to their website and enter the current Crowd Levels for your dates of travel. (60 days of Crown Level info is available for free, or you can subscribe to get a full 365 days.)
2) Room Reservations tab
This tab is for recording your Resort/Hotel reservations. Multiple rows are provided in case you’re booking multiple rooms for a large group, or perhaps you want to split your vacation between different resorts in order to enjoy their unique experiences.
Start by selecting a Resort/Hotel from the dropdown list.
Next, select a Room Type from the dropdown list.
Continue filling in the rest of the details as you plan your trip and book your reservations.
Resorts/Hotels List tab
This tab is a ‘master list’ of hotels that is used to power other parts of the spreadsheet’s functionality. There is nothing on this sheet that you will need to edit.
This tab contains lots of helpful links to the specific websites for each resort, DVC (Disney Vacation Club) info, comparison charts for the resorts/rooms, and sample videos of the room types.
You can use this sheet as a reference for comparing the hotel options and finding which ones you’d like to make reservations for.
Use the filter symbol in the column headers (three diminishing horizontal lines) to filter the list and focus on specific options you’re looking for, such as location or category.
3) Dining Reservations tab
This tab is for recording your restaurant reservations.
Start by selecting a restaurant name from the dropdown list. Details for that restaurant will be automatically populated from the info in the “Restaurants List” tab.
Next, fill in all the details for your specific reservations, such as the number of adults and kids, which meal, and the date and time of the reservation.
TIP: It’s strongly recommended to book dining reservations as far in advance as possible in order to secure your preferred dates and meal times. You are able to begin booking reservations at 6AM EST in the morning 60 days before the first day of your trip. Popular restaurants are often fully booked within minutes, so wake up early and make your dining reservations immediately when booking begins.
Note about Cost estimates
Disney assigns each restaurant a price range that represents the average price of adult dinner entrées. Each range is identified by the number of dollar signs ($).
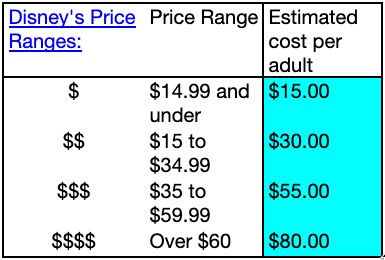
Beware that on the high end the “over $60 per adult” range includes meals that are sometimes WAY more than $60, such as $425 per person at Chef’s Table at Victoria & Albert’s. So, check the website and details for whichever restaurants you want to visit before booking.
In order to provide a rough cost estimate in the spreadsheet, we’ve assigned specific dollar amounts for each range. We’ve based these estimates on our own experiences with dining in the parks, and we’ve set the amount on the high-end of the ranges to try accounting for things like appetizers and drinks in addition to the entrée.
You can edit the amounts if you’d like to try refining the estimate for your own trip (this is done on the “Restaurants List” tab, see details below). If you do make changes, we recommend that it’s better to over-estimate your costs rather than under-estimate them. It’s more fun to finish a vacation having spent less than expected, rather than having spent way more than you budgeted for.
Please note, the amounts in the spreadsheet are only estimates; use your own judgement and the available online menus to get a more detailed idea of what you might want to order/spend.
Restaurants List tab
This tab is a ‘master list’ of restaurants that is used to power other parts of the spreadsheet’s functionality, so be very careful in making changes to it. That said, you can make changes if necessary, such as if a restaurant’s hours or prices change.
You can use this sheet as a reference for comparing the dining options and finding which ones you’d like to make reservations for.
Use the filter symbol in the column headers (three diminishing horizontal lines) to filter the list and focus on specific options you’re looking for, such as a specific park or a specific food type.
We’ve included some comments in the Notes column, such temporary closures or unusual pricing.
As noted above, Disney categorizes restaurants into different price ranges. In order to provide a rough cost estimate in the spreadsheet, we’ve assigned specific dollar amounts for each range. We’ve based these estimates on our own experiences with dining in the parks, and we’ve set the amount on the high-end of the ranges to try accounting for things like appetizers and drinks in addition to the entrée.
If you wish, you can edit the amounts in cells L3, L4 and L5 to try refining the estimate for your trip. If you do make changes, remember to include appetizers and drinks as part of your estimate.
4) Costs tab
This sheet is for estimating the costs for your upcoming trip. Please take it all with a grain of salt. Treat it as an estimate, and give yourself a buffer or “margin for error” in the budget, because it’s easy to get caught up in the excitement and spend more than you planned on. It can make a vacation far less stressful if you budget to spend $8000 but only end up spending $7500, rather than the other way around.
As you fill in the Light Blue input fields throughout the spreadsheet, many of the costs on this tab will automatically update.
Total Cost section
This gives a grand total for all the estimated costs listed in the other sections. It also provides an average cost per person, which is helpful if you’re splitting the expenses with other people.
Park Tickets and Add-ons section
This is automatically populated based on the information entered in the “Tickets & Park Reservations” tab. It shows the total costs for tickets and add-ons, as well as the number of people, number of days, average cost per day and average cost per person.
Rooms section
This is automatically populated based on the information entered in the “Room Reservations” tab. It shows the resort name, number of nights, total costs and average cost per night.
Restaurant Reservation Meals section
This is automatically populated based on the information entered in the “Dining Reservations” tab. It shows the total number of meal reservations you have planned, the average number of people on those reservations, estimated total cost, average cost per meal and average cost per person.
Daily Non-restaurant Meal Estimates section
For those of us that can’t/don’t eat every single meal at a fancy restaurant with a reservation, this section is a way to estimate a meal budget. This represents eating meals at one of the many ‘Quick Service’ dining option in the parks and resorts. We’ve pre-entered estimated $ amounts based on our experiences, but you can update it based on your needs. The number of days for each meal is automatically calculated based on the length of your trip and the number of dining reservations you’ve made.
Miscellaneous Stuff section
This is exactly what it sounds like: the odd-sock drawer of your vacation budget. This is a place to estimate how much you’ll spend on things like souvenirs and groceries (it’s very nice to have some cheap snacks, drinks and meals in your room). This also includes a 10% “safety buffer”, because it’s nicer to finish a vacation under-budget rather than forget something and end up spending more than you planned for.
Packing List tab
This tab contains a sample packing list for a Disney World vacation, based on our previous experiences.
This does NOT mean that you should bring EVERYTHING we’ve listed here. It’s also not all-inclusive. It’s just a starting point that you can customize to meet your needs. Feel free to add and remove items as you see fit.
Suggested quantities will vary based on the length of your trip and the size of your group.
“Daypack” items are things you’ll want with you every day as you explore the parks. A comfortable backpack usually works best.